Showing posts with label Coreldraw Tutorials. Show all posts

Friday, October 18, 2013

Create Text inside of Text Coreldraw.

this tutorial will show you on how to place text inside the container or to the text..i used the version of coreldraw x3  for this tutorial.

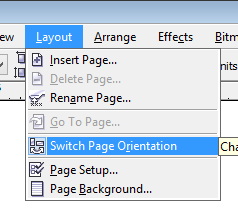
1. Open your Coreldraw and change the page orientation to landscape.

2. Create Text this will be our container.

  • to add text find the text tool on the tool box or simply click F8 , you can also change the font style and size of the text refer to the image below.


3. Create another text this will add or place into our container or the text that i created before.
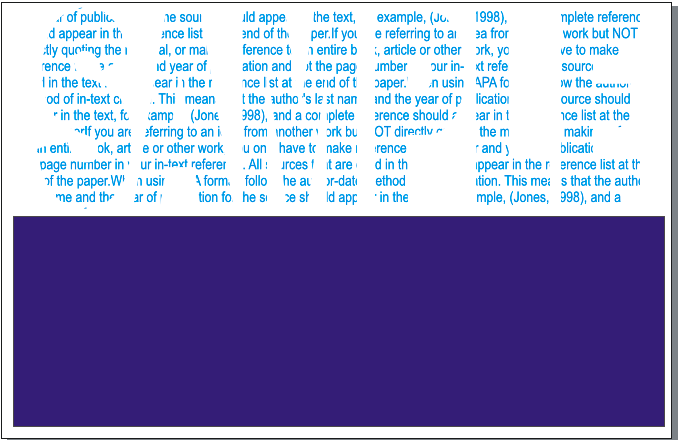
  • i copied an article from google and  i pasted on corel.
  • change the color of the text.
  •  resize the text and fit it to the text 1.
4. Place the 2nd text into the container or to the Text 1.
  • to place the 2nd text select the text 2 and go to Effects>PowerClip>Place Inside Container and click on the text 1 or our container.

5. Adding transparency tool this will make our container become transparent and only the text will remain.
  • look for the transparency tool on the toolbox click it and follow the image below.


6. Adding Background Color.
  • create a rectangle  find the rectangle tool on the toolbox or simply F6 and draw a rectangle in the work space, this will be our background  you can also change the color of the rectangle refer to the step 3 on how to change color.


7. change the order of the background  to back one and place it into our object.
  • click on the background>right click>order>Back one or simply "CTRL + PgDown"
  • drag the background into our object.
this is the final result.

to save the image as .jpg go to file>export and click the export..
Read More

Thursday, October 17, 2013

How to Create Simple Logo Using Corel Draw

this is a simple basic tutorial on how to create your own logo or your school logo using Coreldraw in this tutorial i used the version of Coreldraw x3

1. Open your coreldraw and change the page orientation to landscape.
2. Creating 2 Circle
  • to create a circle go to the toolbox and find the Ellipse Tool or simply clicking F7
  • draw a circle into a workspace and change the size of a circle to 5 refer to the image below

  • create another circle using the Ellipse Tool and change the size to 3.8
3. Place the small circle inside on the bigger circle.
  • to place the small circle, click  the center of the circle, hold and drag to the bigger circle


4. Combining the Circle.
  • drag the 2 circle or CTRL + A to select all then right click >combine or simply CTRL + L

5. Changing the color of the circle
  • you can also change the color of the circle if you don't want the default color w/c is color white.


  • but this example i keep the default color w/c is color white.

6. Adding Text Inside The Circle
  • Add text and place it anywhere in the work space area.
    • you can change the font style,text and color 


  • After creating text we place it inside the circle

    • Select the text and go to text>fit text to path. and drag it inside the circle
7. Create another text and place it below inside the circle.

  • select again the text and select the mirror horizontally and vertically
  • now go to text> fit to path and  drag it below of the circle.
8. Add image or text to the center of the circle you can also add color refer to step 5.
  • in this example i created a text that contain binary to fit to my Logo
  • Place the text or image inside the center of the circle.
    • Select the text>PowerClip>Place Inside Container and click on the center.
  • Adding a Picture to the center, i put a picture aside from the text(this example image was i got on google)
    • to add picture go to file>import and browse the image.
  • Place the image to the center of the circle
    • select the image and go to>Effects>PowerClip>Place inside Container and click on the center of the circle.
9. Group All
  • Drag the logo to select all or simply click CTRL + A right click>group(to create as into one object)
This is the Final Result:
to save the image as .jpg go to file>export and click the export..

Applying Google Logo


Read More

Tuesday, October 15, 2013

HOW TO PLACE IMAGE INSIDE THE TEXT

this simple tutorial will show you on how to place image inside the text using coreldraw the version of corel draw that i used in this tutorial is coreldraw x3..

 1. Open the Corel draw,change the paper size into photocard and also change the page orientation.

2.Create a rectangle and fit it into the workspace this will be the background of your Text..
  • if you want to change the color of the rectangle.


3.  Adding text,change font style and size.

  • to add text find the  A  icon in the toolbox and click it or simply press F8.
  • after adding text and resizing the text into a bigger one


4. Add image.
  • to add image go to file>import and browse the image.
5. Set the image to the back one
  • to set the image click the image rightclick>order>backone or simply  CTRL + PgDn.

6. Place the image inside the container or the text

  • to place the image inside the text click on the image>Powerclip>Place inside container and click on the text.


7. Adding drop shadow to the text.

follow this drop shadow settings

This is the final result..


to save the image as .jpg go to file>export and click the export..

Read More
Designed By Seo Blogger Templates Published.. Blogger Templates