in this tutorial i used CS6 Photoshop.
- go to>File>Open> and browse the image.
2. Duplicate your image.
- Layer>Duplicate Layer or simply "CTRL + J"
- refer to the image below.
3. Create layer( place it between the two image) and fill it to color Blue or any color that you want.
- to add layer go to> layer>new>layer or simply "CTRL + SHIFT + N"
- to add fill go to edit>fill or simply "SHIFT + F5"
- under use select color and pick a color and click ok. refer to the image below.
4. Add another Layer above the Layer 2.
- Layer>new>layer
5. Create a Marquee Tool
- to create marquee tool click m or simply refer to the image.
- drag or create a rectangle shape, this would be the image in your Polaroid refer to the image.
6. Fill with background color.
- under layer 3 click ALT + BACK SPACE this will fill with background color, it should be looks like this in the image 3.
7. Create Clipping Mask, this time select the layer 1 and create it to a clipping mask.
- to create a Clipping Mask go to>Layer>Create Clipping Mask or Simply "Ctrl + Alt + G"
- after creating Clipping Mask, the image should like this.
8. Add another layer to the top of layer 2, this would be the frame of your Polaroid.
- Layer>New>Layer.
- Create another Marquee Tool and Fill it to color white, go to step 3 on how to add fill color.
- After Filling into a color while this would be the image
- Click CTRL + D to Deselect
9. Creating Drop Shadow to the Layer 4, this would add a frame shadow to your Polaroid.
- Adding Drop Shadow right click layer 4> Click Blending Option>check the drop shadow or Simply Click the FX icon and click the Drop Shadow you can also adjust the Shadow.
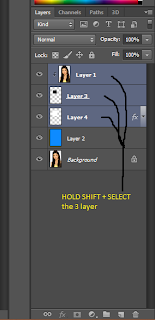
10. Group the 3 Layers (Layer1,Layer3,Layer4)
- grouping the 3 layers>hold the SHIFT while clicking the Layer1,Layer3 and Layer4 refer to the image and Click "Ctrl + G" to Group

11. Duplicate The Group1 and Add another Collage.
- To Duplicate the Group 1 Simply Click "Ctrl + J"
- Click the Group 1 to Unhide the layer
12. Repeat the Step 11,it depends to you on how many duplicate that you made, you can also Rotate it by placing the mouse into the side of the image until the cursor mouse change into rotate cursor.


nice blog john.. =)
ReplyDeleteGood stuff! Also, for anyone looking to use Photoshop to turn photos into polaroids (polaroid frame around photo), check out this quick Photoshop Action: Polaroid Photoshop Action
ReplyDeletesample comment
ReplyDeleteThis comment has been removed by the author.
ReplyDeleteGreat post! This really helps people to understand better! Thanks for share this information.
ReplyDeleteClipping Path Service
Thanks for awesome inspiring post. You have a bundle of good info in this post which really helps people in great way. And they will come for your more posts.
ReplyDeleteWe are providing online image editing system > Clipping Path